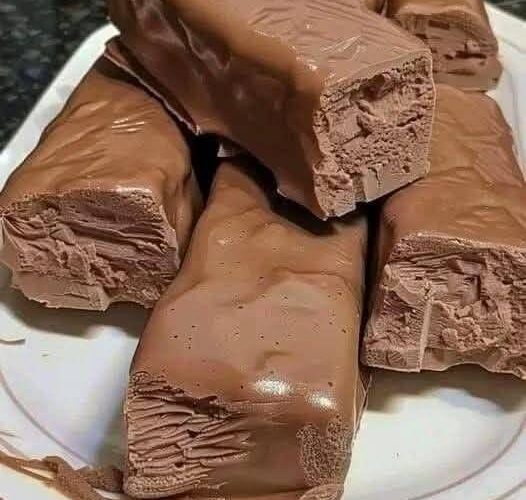
For anyone who loves the classic combination of coconut and chocolate but wants to reduce sugar and carbohydrates, these homemade keto bounty bars are a delicious alternative. They capture the same qualities that make traditional coconut chocolate bars so popular: a soft coconut-filled center, a rich chocolate coating, and a satisfying contrast between creamy filling and firm chocolate shell.
Traditional coconut chocolate bars usually contain a large amount of sugar, which makes them unsuitable for many low-carb lifestyles. This keto-friendly version replaces regular sugar with a low-carb sweetener while keeping the familiar coconut flavor and indulgent texture.
The secret to a successful homemade bounty bar is achieving the right balance between moisture and structure. The coconut filling should be soft and slightly chewy without becoming wet or crumbly. The chocolate coating should form a smooth outer layer that becomes firm after chilling while still melting pleasantly when eaten.
These bars are easy to prepare, require no baking, and can be stored for weeks. They are ideal for keeping in the refrigerator as a quick low-carb dessert, an afternoon snack, or a small sweet treat after meals.
Why You’ll Love This Recipe
- This recipe is popular because it delivers the flavor of a classic chocolate coconut bar while using simple keto-friendly ingredients.
- Some reasons these bars are worth making:
- Low in carbohydrates
- Completely sugar-free when using keto chocolate and sweetener
- No baking required
- Made with simple ingredients
- Easy to prepare ahead of time
- Suitable for freezer storage
- Rich coconut flavor with a smooth chocolate coating
- The recipe is also highly customizable. You can adjust the sweetness, chocolate intensity, or texture depending on your preferences.
Coconut Creates the Signature Filling
- Unsweetened shredded coconut forms the foundation of the recipe. It provides the natural coconut flavor and creates the chewy texture associated with bounty-style bars.
- Fine or medium shredded coconut usually works best because it creates a smoother filling. Larger coconut pieces may make the bars harder to shape and coat evenly.
- Coconut Cream Adds Moisture
- Full-fat coconut cream helps bind the coconut mixture together while adding richness.
- Only the thick coconut cream portion should be used rather than the watery liquid found in some coconut milk products. The thicker texture helps create a stable filling that holds its shape.
- Sweetener Provides Balanced Sweetness
- Powdered erythritol or a monk fruit blend works well because it dissolves more smoothly than granulated sweeteners.
- Using powdered sweetener prevents a gritty texture and creates a more traditional candy-like finish.
- Coconut Oil Improves Texture
- Melted coconut oil adds richness and helps hold the filling together. It also improves the texture of the chocolate coating by creating a smoother finish.
- Chocolate Creates the Outer Shell
- The chocolate coating is what gives these bars their signature appearance and flavor.
- Sugar-free dark chocolate or keto chocolate chips work best. Adding a small amount of coconut oil helps create a thinner coating that spreads easily and hardens with a smooth shine.
Preparing the Coconut Filling
- The first step is creating the coconut center.
- The shredded coconut is combined with powdered sweetener and salt to distribute the dry ingredients evenly. Salt may seem like a small addition, but it enhances the sweetness and helps balance the rich coconut flavor.
- The wet ingredients—coconut cream, melted coconut oil, and vanilla extract—are mixed separately before being added to the coconut mixture.
- Once combined, the mixture should become thick and sticky enough to shape.
- The ideal consistency should:
- Hold together when pressed
- Feel moist but not oily
- Maintain its shape after forming
- If the mixture feels too dry, a small amount of additional coconut cream can help. If it feels too soft, adding extra shredded coconut improves the structure.
Shaping the Bars
- Shaping is an important step because compact bars are much easier to coat with chocolate.
- The mixture can be formed into traditional rectangular bars or simpler rounded logs.
- Pressing firmly while shaping removes air pockets and helps prevent the bars from breaking during dipping.
- Once shaped, the bars are placed on parchment paper before chilling.
Why Freezing Helps
- Freezing the coconut centers before coating makes the process much easier.
- The cold temperature:
- Firms the filling
- Prevents the bars from softening during dipping
- Helps the chocolate set faster
- Creates a cleaner coating
- The bars should become firm but should not freeze completely solid.
Creating the Chocolate Coating
- The chocolate can be melted using either a double boiler or microwave method.
- A gentle melting process is important because overheating chocolate can cause it to become thick or lose its smooth texture.
- Once melted, coconut oil is added to improve the consistency and create a glossy coating.
- The finished chocolate should be smooth enough for easy dipping.
Coating the Bars
- Each chilled coconut bar is dipped into the melted chocolate until completely covered.
- Using a fork makes the process easier because excess chocolate can drip away before placing the bar back onto parchment paper.
- Working quickly helps prevent the coconut centers from becoming too soft while they are exposed to room temperature.
- After coating, the bars are refrigerated until the chocolate becomes firm.
Texture and Flavor Guide
- A successful keto bounty bar should have:
- Chocolate exterior:
A firm shell that lightly cracks when bitten. - Coconut center:
Soft, moist, and slightly chewy. - Sweetness:
Balanced and satisfying without an artificial aftertaste. - Overall texture:
Rich and creamy without feeling greasy.
Common Problems and Solutions
- Grainy Filling
- Cause: Using granulated sweetener.
- Solution: Use powdered sweetener for a smoother texture.
- Bars Break During Coating
- Cause: Filling is too dry or loosely shaped.
- Solution: Add a little more coconut cream and press the mixture firmly.
- Chocolate Coating Is Too Thick
- Cause: Chocolate lacks enough added fat.
- Solution: Add coconut oil to thin the coating.
- Chocolate Cracks After Setting
- Cause: Bars were extremely cold during dipping.
- Solution: Allow chilled bars to sit briefly before coating.
- Oily Filling
- Cause: Too much coconut oil.
- Solution: Reduce the oil slightly in the next batch.
Delicious Variations
- Almond Coconut Bars
- Place a whole almond inside each bar before shaping for a nutty center.
- Toasted Coconut Version
- Lightly toast the shredded coconut before mixing to create a deeper roasted flavor.
- Extra Creamy Version
- Add a small amount of mascarpone cheese for a softer, richer filling.
- Protein Version
- Mix in vanilla or unflavored protein powder and adjust coconut cream as needed.
- Dark Chocolate Version
- Use a higher cocoa percentage chocolate for a stronger chocolate flavor.
Storage and Make-Ahead Tips
- These bars are excellent for preparing in advance.
- Store them in an airtight container in the refrigerator for up to two weeks.
- For longer storage, freeze them for up to three months. Allow frozen bars to soften for several minutes before eating for the best texture.
- Keeping them chilled also helps maintain the clean chocolate shell and firm coconut center.
Keto Bounty Bars
Description
- A low-carb, sugar-free coconut chocolate treat featuring a soft chewy coconut center covered with a smooth dark chocolate shell. These no-bake bars are easy to prepare and perfect for keto-friendly snacking.
Recipe Information
- Course: Dessert, Snack
- Cuisine: Low-Carb / Keto
- Difficulty: Easy
- Servings: Approximately 12 bars
- Preparation Time: 25 minutes
- Chilling Time: 50–75 minutes
- Total Time: About 1 hour 15 minutes
Ingredients
Coconut Filling
- 2½ cups unsweetened shredded coconut
- ½ cup full-fat coconut cream (thick portion only)
- ¼ cup powdered erythritol or monk fruit sweetener
- 2 tablespoons melted coconut oil
- 1 teaspoon vanilla extract
- Pinch of salt
Chocolate Coating
- 200 g sugar-free dark chocolate or keto chocolate chips
- 1 tablespoon coconut oil
Equipment
- Mixing bowl
- Silicone spatula
- Baking tray
- Parchment paper
- Fork or dipping tool
- Microwave-safe bowl or double boiler
- Refrigerator or freezer
Instructions
- Prepare Coconut Mixture
- Add shredded coconut, powdered sweetener, and salt to a bowl.
- Mix until evenly combined.
- Add Wet Ingredients
- Combine coconut cream, melted coconut oil, and vanilla extract.
- Pour into the coconut mixture and stir until a thick dough forms.
- Check Texture
- The mixture should hold together when pressed.
- If too dry, add a small amount of coconut cream.
- If too wet, add more shredded coconut.
- Shape Bars
- Line a tray with parchment paper.
- Shape the mixture into small rectangles or logs.
- Press firmly to compact.
- Chill
- Freeze the shaped bars for 30–45 minutes until firm.
- Melt Chocolate
- Melt chocolate gently using a double boiler or microwave.
- Add coconut oil and stir until smooth.
- Coat Bars
- Dip each chilled bar into melted chocolate.
- Allow excess chocolate to drip away.
- Place coated bars back onto parchment paper.
- Set Chocolate
- Refrigerate for 20–30 minutes until the coating becomes firm.
Storage Instructions
- Refrigerator: Store in an airtight container for up to 2 weeks.
- Freezer: Store for up to 3 months.
- Thaw for several minutes before serving.
Nutrition
- Calories: 120–150 kcal
- Net Carbohydrates: 2–3 g
- Fat: 12–14 g
- Protein: 1–2 g
Recipe Notes
- Use powdered sweetener for the smoothest texture.
- Compact the coconut mixture firmly before chilling.
- Use quality sugar-free chocolate for the best flavor.
- Keep bars cold for the cleanest texture.
- The recipe can easily be doubled or tripled for larger batches.
