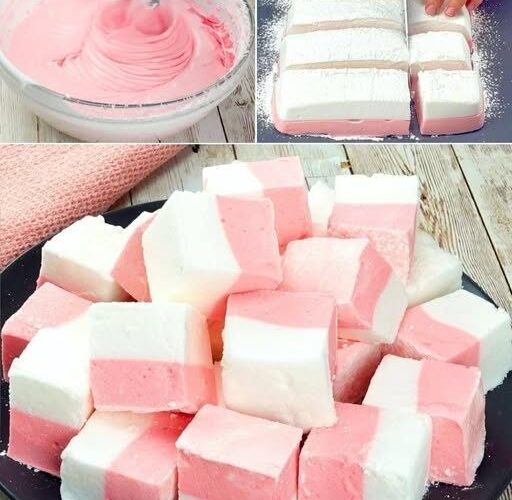
Homemade marshmallows are one of those sweet treats that seem simple but feel magical when you make them yourself. Unlike packaged marshmallows, which often have a long shelf life and a firm texture, fresh homemade marshmallows are incredibly soft, airy, and delicate. They have a melt-in-your-mouth quality and a richer flavor because you can choose the ingredients, sweetness level, and flavors according to your preference.
Making marshmallows at home is also a fun kitchen project. The process transforms a few basic ingredients into a fluffy dessert with a unique texture. A simple mixture of sugar, gelatin, water, and flavoring becomes a light and cloud-like confection after careful cooking and whipping. Understanding how each ingredient works makes the process easier and helps you create better results every time.
What Are Homemade Marshmallows?
Marshmallows are soft, sweet confections made by combining a sugar syrup with gelatin and whipping air into the mixture. The gelatin gives marshmallows their signature springy texture, while the sugar provides sweetness and structure. During whipping, thousands of tiny air bubbles become trapped inside the mixture, creating the soft and fluffy texture that makes marshmallows special.
Traditional marshmallows were originally made using the extract of the marshmallow plant, which was used as a thickening ingredient. Modern marshmallows no longer use the plant extract and instead rely on gelatin or other setting agents to create the familiar texture.
Today, marshmallows are enjoyed around the world in many ways. They are added to hot chocolate, used in desserts, roasted over campfires, mixed into baked goods, or eaten as a simple snack.
Why Make Marshmallows at Home?
Store-bought marshmallows are convenient, but homemade versions offer several advantages.
Better Flavor Control
When you prepare marshmallows yourself, you can adjust the flavor to your liking. Classic vanilla is always popular, but you can experiment with chocolate, strawberry, coffee, coconut, peppermint, citrus, or other flavors.
Fresh Texture
Fresh marshmallows have a softer and more delicate texture than packaged varieties. They are especially enjoyable when eaten within a few days of preparation.
Customizable Sweetness
Some commercial marshmallows can be very sweet. Homemade recipes allow you to control the amount of sugar and balance the sweetness with different flavor additions.
Fun Creative Options
You can create colorful marshmallows for holidays, birthdays, parties, or gifts. Adding natural colors, different shapes, or decorative coatings makes them more attractive and enjoyable.
The Science Behind Soft and Fluffy Marshmallows
Understanding the role of each ingredient is the key to making successful marshmallows.
Gelatin: The Structure Builder
Gelatin is the ingredient responsible for the marshmallow’s unique texture. When gelatin absorbs water, it softens and expands. This process is called blooming.
After the hot sugar syrup is added, the gelatin melts and spreads throughout the mixture. As the mixture cools, the gelatin forms a network that holds everything together while still allowing the marshmallow to remain soft and flexible.
Using the correct amount of gelatin is important. Too little gelatin can result in marshmallows that do not set properly, while too much can make them overly firm.
Sugar Syrup: Sweetness and Stability
Sugar syrup provides sweetness and helps create the proper consistency. The syrup must be heated carefully because the temperature affects the final texture.
If the syrup is not cooked enough, the marshmallows may become too soft or sticky. If it is overheated, the final product may become too firm.
Careful temperature control creates marshmallows that are stable but still light and tender.
Air: The Secret Ingredient
The fluffy texture of marshmallows comes from air. During whipping, the mixture expands as air becomes trapped inside.
The longer and properly you whip the mixture, the lighter it becomes. This is why using a mixer is much easier than mixing by hand.
Common Mistakes and How to Avoid Them
Not Blooming the Gelatin Properly
Gelatin needs time to absorb water before use. Skipping this step can lead to uneven texture.
Cooking the Syrup Incorrectly
The sugar syrup temperature plays a major role in the final result. Using a kitchen thermometer can improve accuracy.
Not Whipping Long Enough
Under-whipped marshmallows may be dense instead of fluffy. Continue mixing until the mixture becomes thick, pale, and increases in volume.
Working Too Slowly
Marshmallow mixture starts setting as it cools. Prepare your tray before whipping so you can transfer the mixture quickly.
Forgetting the Coating
Without powdered sugar or cornstarch, marshmallows can stick together. A light coating keeps each piece separate.
Flavor Ideas and Creative Variations
Homemade marshmallows can be customized in many ways.
Vanilla Marshmallows
A classic option with a sweet and familiar flavor. Vanilla extract creates a simple but delicious result.
Chocolate Marshmallows
Add cocoa flavor for a richer dessert that pairs perfectly with hot chocolate.
Strawberry Marshmallows
Fruit flavors add freshness and a beautiful color. Strawberry-flavored marshmallows are especially popular for gifts and celebrations.
Peppermint Marshmallows
A refreshing choice for winter drinks and holiday desserts.
Lemon Marshmallows
A light citrus flavor balances the sweetness and creates a bright taste.
Colorful Marshmallows
Food coloring can be added to create themed marshmallows for parties or special occasions.
Recipe Information
Preparation Time:
20 minutes
Cooking Time:
10–15 minutes
Whipping Time:
8–12 minutes
Setting Time:
4–6 hours or overnight
Total Time:
Approximately 5–7 hours including setting
Difficulty Level:
Intermediate
Servings:
Approximately 24–36 marshmallow pieces depending on size
Category:
Dessert / Sweet Treat
Cuisine:
Homemade Confectionery
Ingredients
For the Marshmallow Mixture
- 3 tablespoons unflavored gelatin powder
- 1/2 cup cold water (for blooming gelatin)
- 2 cups granulated sugar
- 3/4 cup water
- 1/2 cup light corn syrup or glucose syrup (optional but recommended for smooth texture)
- 1 teaspoon vanilla extract
- A small pinch of salt
For Coating
- 1/2 cup powdered sugar
- 1/2 cup cornstarch
The coating mixture prevents the marshmallows from becoming sticky and helps keep the pieces separated.
Equipment Needed
- Medium saucepan
- Large mixing bowl
- Electric hand mixer or stand mixer
- Measuring cups and spoons
- Baking tray or square pan
- Baking paper or plastic wrap
- Spatula
- Sharp knife or kitchen scissors
- Cooking thermometer (recommended)
Step-by-Step Instructions
Step 1: Prepare the Tray
Before making the marshmallow mixture, prepare your setting tray.
Lightly grease the inside of the tray with oil or cooking spray. Line it with baking paper if desired. Dust the surface with a mixture of powdered sugar and cornstarch.
This preparation prevents the sticky marshmallow mixture from attaching to the tray and makes removal easier later.
Step 2: Bloom the Gelatin
Place the gelatin powder into a large mixing bowl. Add cold water and gently stir.
Allow the gelatin to sit for about 5–10 minutes. During this time, it will absorb the water and become soft.
Blooming is an important step because it allows the gelatin to dissolve evenly when the hot syrup is added. Properly bloomed gelatin creates a smooth and stable marshmallow texture.
Step 3: Cook the Sugar Syrup
Add sugar, water, corn syrup, and salt to a saucepan.
Heat the mixture over medium heat while stirring gently until the sugar completely dissolves.
Once dissolved, stop stirring and allow the mixture to cook. Continue heating until the syrup reaches the correct temperature.
For best results, the syrup should reach approximately 240°F (115°C), also known as the soft-ball stage.
Cooking the syrup correctly helps create marshmallows that are soft but stable.
Step 4: Combine Syrup and Gelatin
Carefully pour the hot sugar syrup into the bowl containing the bloomed gelatin.
Be extremely careful because the syrup is very hot.
Begin mixing at a low speed to combine the ingredients safely. Once the mixture becomes smooth, gradually increase the mixer speed.
Step 5: Whip Until Fluffy
Continue beating the mixture for several minutes.
At first, it will look like a clear liquid. Slowly, it will become thicker, lighter in color, and increase in volume.
Keep mixing until the marshmallow mixture becomes:
- Thick
- White
- Fluffy
- Slightly glossy
- Able to hold soft peaks
This process creates the airy texture that makes marshmallows special.
Add vanilla extract near the end of whipping and mix until evenly combined.
Step 6: Transfer to the Tray
Immediately pour the marshmallow mixture into the prepared tray.
Because marshmallow mixture becomes sticky quickly, work efficiently.
Use a lightly greased spatula to spread the mixture evenly across the tray.
Smooth the top as much as possible, but do not worry if it is not perfectly flat.
Step 7: Allow Marshmallows to Set
Leave the tray uncovered at room temperature for 4–6 hours or overnight.
During this time, the gelatin will strengthen and create the final soft, bouncy texture.
Avoid moving the tray too much while the marshmallows are setting.
Step 8: Cut the Marshmallows
Once fully set, sprinkle the top with the powdered sugar and cornstarch mixture.
Carefully remove the marshmallow slab from the tray.
Place it on a clean cutting board and cut it into squares using a sharp knife or scissors.
Coat each cut side with the powdered sugar mixture to prevent sticking.
Your homemade marshmallows are now ready to enjoy.
Nutrition Information
(Approximate values per serving; actual nutrition may vary depending on ingredients and serving size.)
Serving Size:
1 marshmallow piece
Calories:
Approximately 70–90 calories
Carbohydrates:
15–20 grams
Sugar:
14–18 grams
Protein:
1–2 grams
Fat:
0 grams
Fiber:
0 grams
Sodium:
Small amount
Homemade marshmallows are mainly a sugar-based dessert, so they are best enjoyed as an occasional sweet treat.
Storage Instructions
Store homemade marshmallows in an airtight container.
For best quality:
- Keep them at room temperature.
- Store in a cool, dry place.
- Separate layers with baking paper.
- Avoid refrigeration.
Properly stored marshmallows can stay fresh for about one to two weeks.
Creative Serving Ideas
Hot Chocolate Topping
Place a few homemade marshmallows on top of hot chocolate and allow them to melt slightly for a creamy drink.
Dessert Decoration
Use colorful marshmallow pieces to decorate cakes, cupcakes, and dessert plates.
Gift Packaging
Place marshmallows in decorative bags or boxes for homemade gifts during holidays, birthdays, or special occasions.
Toasted Marshmallows
Lightly toast marshmallows over a flame for a caramelized outside and soft melted center.
Recipe Variations
Chocolate Marshmallows
Add cocoa powder or melted chocolate flavoring during the final whipping stage.
Strawberry Marshmallows
Use strawberry flavoring or fruit powder to create a fruity version.
Coconut Marshmallows
Coat finished marshmallows with shredded coconut for extra flavor.
Coffee Marshmallows
Add a small amount of instant coffee dissolved in water for a coffee-flavored treat.
Holiday Marshmallows
Use different colors and shapes for seasonal celebrations.
