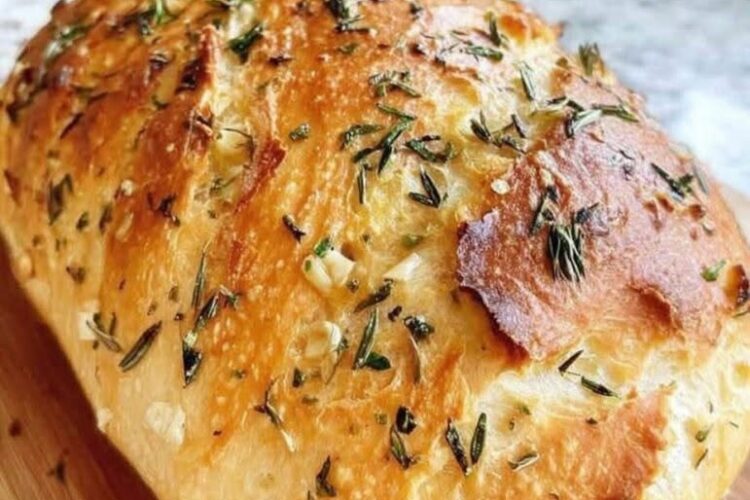
Making homemade bread is one of the most rewarding kitchen experiences, but for many people following a gluten-free lifestyle, baking bread at home can feel complicated. Traditional bread depends on gluten, a protein found in wheat, to create elasticity, structure, and the familiar chewy texture of a classic loaf. Without gluten, achieving a soft and sliceable bread requires a different approach.
This No-Knead Gluten-Free Bread recipe removes the difficulty from gluten-free baking. It does not require kneading, special bread machines, or advanced techniques. Instead, it uses a carefully balanced combination of gluten-free flours, starches, a natural binder, and yeast to create a loaf that is soft, flavorful, and easy to prepare.
The dough comes together quickly with simple mixing. After resting, the ingredients work together to create a stable structure that can rise properly and bake into a golden loaf. The finished bread has a tender interior, a lightly crisp crust, and enough strength to slice for sandwiches, toast, or everyday meals.
This recipe is ideal for beginners, busy home cooks, and anyone who wants fresh gluten-free bread without spending hours in the kitchen.
Why This Gluten-Free Bread Recipe Works
- Gluten-free baking requires understanding how different ingredients work together. Since there is no gluten to provide stretch and support, other ingredients must take over those roles.
- This recipe succeeds because every component has a purpose.
No Kneading Required
- Traditional bread dough is kneaded to develop gluten. The process creates a network that traps yeast-produced air bubbles and gives bread its structure.
- Since gluten-free dough does not behave the same way, kneading is unnecessary. Instead, this recipe relies on:
- Proper hydration
- Psyllium husk binding
- Starch balance
- Yeast fermentation
- The result is a simple preparation method with excellent texture.
The Difference Between Gluten-Free Dough and Traditional Dough
- Traditional wheat dough is elastic and stretchy because gluten proteins form a strong network.
- Gluten-free dough is different.
- It is usually:
- Softer
- More sticky
- More batter-like
- Less elastic
- This is completely normal.
- The goal is not to create a dough that feels like wheat bread dough. Instead, gluten-free bread requires the right balance of ingredients to create a structure that holds together after baking.
The Role of Each Ingredient
- Every ingredient in this recipe contributes something important to the final loaf.
- Rice Flour: The Main Foundation
- Rice flour provides the primary flour base.
- It contributes:
- Mild flavor
- Light texture
- Neutral taste
- Stable crumb
- Because rice flour has a gentle flavor, it works well for both sweet and savory bread recipes.
- It creates a clean base that allows other ingredients to improve the texture.
Tapioca Starch: Adding Softness and Flexibility
- Tapioca starch is commonly used in gluten-free baking because it helps replace some of the qualities normally provided by gluten.
- It improves:
- Softness
- Slight chewiness
- Flexibility
- Overall texture
- Without tapioca starch, gluten-free bread can sometimes become dry or crumbly.
- This ingredient helps create a loaf that feels more similar to traditional bread.
Potato Starch: Improving Moisture Retention
- Potato starch helps keep gluten-free bread soft.
- It provides:
- Moist crumb
- Tender texture
- Better freshness
- Gluten-free bread can sometimes dry out faster than wheat bread, so moisture-retaining ingredients are especially valuable.
- Potato starch helps the loaf stay enjoyable for several days.
Psyllium Husk: The Key Binding Ingredient
- Psyllium husk is one of the most important ingredients in this recipe.
- When mixed with water, psyllium forms a gel-like substance that helps hold the bread together.
- It creates:
- Better structure
- Improved flexibility
- Easier slicing
- More bread-like texture
- Without a binder like psyllium, gluten-free bread often becomes fragile and falls apart.
- This ingredient helps create a loaf that can be sliced cleanly and used for sandwiches.
Yeast: Creating Rise and Airiness
- Yeast gives the bread its lift.
- When activated, yeast consumes sugar and produces carbon dioxide bubbles. These bubbles expand during proofing and baking, creating a lighter texture.
- Fresh, active yeast helps produce:
- Better volume
- Softer crumb
- More traditional bread flavor
- Allowing enough time for fermentation is important because gluten-free dough needs time to develop structure.
Eggs: Improving Strength and Moisture
- Eggs are optional but highly beneficial.
- They help with:
- Structure
- Moisture
- Richness
- Better crust color
- Eggs also improve the stability of the loaf, making it easier to slice.
- For a vegan version, eggs can be replaced with suitable alternatives, although the texture may vary slightly.
Olive Oil or Butter: Adding Tenderness
- A small amount of fat improves the overall eating experience.
- Oil or melted butter helps create:
- Softer texture
- Better flavor
- More tender slices
- It also helps prevent the bread from becoming dry.
Preparing the Gluten-Free Bread Dough
- The preparation process is simple and requires no complicated techniques.
- Mixing the Dry Ingredients
- The first step is combining the gluten-free flour mixture.
- The dry ingredients include:
- Rice flour
- Tapioca starch
- Potato starch
- Psyllium husk
- Salt
- Mixing these ingredients thoroughly ensures that the psyllium spreads evenly throughout the flour.
- This creates a more consistent loaf.
Activating the Yeast Properly
- The yeast should be mixed with warm liquid and a small amount of sugar.
- The water should be warm, not hot.
- Very hot water can damage yeast, while cold water may slow activation.
- After several minutes, the mixture should show signs of activity, such as:
- Light foam
- Small bubbles
- Yeasty aroma
- This indicates that the yeast is ready.
Combining Wet and Dry Ingredients
- Once the yeast mixture is prepared, it is added to the dry ingredients.
- The eggs and oil or butter are added at this stage.
- The dough should become:
- Thick
- Sticky
- Soft
- Do not try to knead it like wheat dough.
- Gluten-free dough works differently and should simply be mixed until combined.
Why Resting the Dough Is Important
- Resting replaces the kneading process used in traditional bread making.
- During this time:
- Psyllium absorbs moisture
- The dough becomes thicker
- Yeast creates air bubbles
- Flavors develop
- This resting period is essential for achieving the best texture.
- A rushed dough may produce a loaf that is dense or uneven.
Baking the Bread Successfully
- After resting, the dough is transferred into a prepared loaf pan.
- Because gluten-free dough is sticky, using:
- A wet spatula
- Wet hands
- Lightly oiled tools
- makes shaping easier.
- The loaf is then allowed to rise briefly before baking.
- During baking:
- Yeast activity creates final expansion
- The crust develops a golden color
- The interior sets into a soft crumb
- The bread should be fully baked before removing it from the oven.
Texture and Flavor of Homemade Gluten-Free Bread
- A successful loaf should have a pleasant balance.
- Texture
- The bread should be:
- Soft inside
- Slightly springy
- Moist but not wet
- Strong enough for slicing
- Flavor
- The taste is:
- Mild
- Slightly nutty from the grains
- Lightly sweet
- Neutral enough for many toppings
- This makes it suitable for breakfast, lunch, and dinner.
Serving Ideas
- This gluten-free bread can be enjoyed in many ways.
- Breakfast Options
- Serve with:
- Butter
- Jam
- Honey
- Peanut butter
- Scrambled eggs
- Avocado
- Toast slices for an extra crisp texture.
Lunch Ideas
- Use it for:
- Sandwiches
- Grilled cheese
- Vegetable fillings
- Chicken salad sandwiches
- The sturdy texture makes it practical for everyday meals.
Dinner Pairings
- Enjoy it alongside:
- Soups
- Stews
- Salads
- Pasta dishes
- A slice of homemade bread adds comfort to any meal.
Gluten-Free Bread Variations
- Herb Bread
- Add:
- Rosemary
- Basil
- Thyme
- Oregano
- This creates a flavorful loaf that pairs beautifully with soups.
- Garlic Bread Style
- Mix in:
- Garlic powder
- Herbs
- Extra butter after baking
- Perfect as a side dish.
- Seeded Gluten-Free Bread
- Add:
- Chia seeds
- Flax seeds
- Sunflower seeds
- Pumpkin seeds
- Seeds add texture and extra flavor.
- Sweet Breakfast Bread
- Add:
- Cinnamon
- Raisins
- Honey
- This creates a delicious morning toast option.
Common Gluten-Free Bread Problems
- Bread Is Too Dense
- Possible reasons:
- Yeast was inactive
- Dough did not rest long enough
- Too much flour was added
- Solutions:
- Check yeast freshness
- Allow proper rising time
- Measure ingredients carefully
- Bread Has a Gummy Center
- Possible reasons:
- Bread was sliced too early
- Not baked long enough
- Too much liquid
- Solutions:
- Cool completely before slicing
- Bake until fully set
- Adjust liquid carefully
- Bread Falls Apart
- Possible reasons:
- Not enough psyllium
- Poor mixing
- Incorrect ingredient balance
- Solutions:
- Measure binding ingredients accurately
- Mix thoroughly
- Allow proper resting time
- Bread Is Too Dry
- Possible reasons:
- Overbaking
- Too little moisture
- Improper storage
- Solutions:
- Check baking time
- Store in airtight packaging
- Add slightly more moisture if needed
Storage Instructions
- Room Temperature
- Store bread in an airtight container or sealed bag.
- It stays fresh for approximately:
- Up to 2 days
- Refrigerator Storage
- For longer freshness:
- Store in the refrigerator for up to:
- 5 days
- Warm slices slightly before serving for the best texture.
Freezing Instructions
- Gluten-free bread freezes very well.
- For convenience:
- Allow bread to cool completely.
- Slice the loaf.
- Place slices in a freezer-safe bag.
- Freeze for up to 3 months.
- Toast slices directly from frozen whenever needed.
Recipe Information
- Recipe Name: No-Knead Gluten-Free Bread
- Category: Gluten-Free Recipes, Bread, Breakfast
- Cuisine: Homemade Baking
- Difficulty Level: Easy
- Preparation Time: 15 minutes
- Resting Time: 1 hour 30 minutes
- Proofing Time: 20–30 minutes
- Baking Time: 45–55 minutes
- Total Time: Approximately 2 hours 30 minutes
- Servings: 10–12 slices
Ingredients
- Dry Ingredients
- Rice Flour
- 1 cup
- Provides the main flour base and creates a mild flavor with a light texture.
- Tapioca Starch
- ½ cup
- Adds softness, flexibility, and a slightly chewy texture.
- Potato Starch
- ½ cup
- Helps retain moisture and creates a tender crumb.
- Psyllium Husk Powder
- 1½ tablespoons
- Provides binding and helps create a bread-like structure.
- Salt
- 1 teaspoon
- Enhances flavor and balances the ingredients.
Wet Ingredients
- Warm Water or Milk
- 1 to 1¼ cups
- Provides moisture and activates the ingredients.
- Active Dry Yeast
- 1 teaspoon
- Helps the bread rise and creates a lighter texture.
- Sugar
- 1 teaspoon
- Supports yeast activation and adds slight sweetness.
- Eggs
- 2 large eggs (optional)
- Improves structure, moisture, and richness.
- Olive Oil or Melted Butter
- 1 tablespoon
- Creates a softer crumb and improves flavor.
Equipment Needed
- Large mixing bowl
- Small bowl for yeast activation
- Measuring cups and spoons
- Whisk or wooden spoon
- Loaf pan (approximately 8×4 inch or similar)
- Spatula
- Clean kitchen towel
- Oven
Instructions
- Prepare the Dry Mixture
- In a large mixing bowl, combine:
- Rice flour
- Tapioca starch
- Potato starch
- Psyllium husk powder
- Salt
- Mix thoroughly until all ingredients are evenly distributed.
- This step is important because psyllium needs to be spread throughout the flour mixture to create a consistent texture.
- Activate the Yeast
- In a separate small bowl, add:
- Warm water or milk
- Sugar
- Active dry yeast
- Stir gently and allow the mixture to rest for approximately:
- 5–10 minutes
- The yeast mixture should become slightly foamy.
- This indicates that the yeast is active and ready to help the bread rise.
- Combine the Ingredients
- Pour the activated yeast mixture into the dry ingredients.
- Add:
- Eggs
- Olive oil or melted butter
- Mix everything together using a wooden spoon or spatula.
- The dough will be:
- Thick
- Sticky
- Soft
- This is normal for gluten-free bread.
- Do not knead the dough because gluten-free dough does not require traditional kneading.
- Allow the Dough to Rest
- Cover the bowl with a clean kitchen towel.
- Leave the dough to rest for:
- 1–2 hours
- During this time:
- Psyllium absorbs liquid
- The dough becomes thicker
- Yeast produces air bubbles
- Flavor develops
- This resting period helps replace the structure normally created by kneading.
- Prepare the Loaf Pan
- Lightly grease a loaf pan with oil or butter.
- Transfer the dough into the pan.
- Because gluten-free dough is sticky, use:
- A wet spatula
- Slightly damp hands
- to smooth the surface.
- Create an even top so the bread bakes evenly.
- Final Proofing
- Cover the loaf pan loosely with a towel.
- Allow the dough to rest again for:
- 20–30 minutes
- The dough should increase slightly in volume.
- Avoid allowing it to rise too much because gluten-free bread can lose structure if over-proofed.
- Bake the Bread
- Preheat the oven to:
- 350°F (180°C)
- Bake the bread for:
- 45–55 minutes
- The loaf is finished when:
- The top is golden brown
- The bread feels firm
- The center is fully cooked
- The bottom sounds slightly hollow when tapped
- If the top browns too quickly, loosely cover it with foil during the final part of baking.
- Cool Completely
- Remove the bread from the pan.
- Place it on a cooling rack.
- Allow it to cool for at least:
- 1 hour
- Cooling allows the inside structure to finish setting.
- Avoid slicing while warm because the bread may appear gummy or sticky.
Nutrition Information
- Approximate values per slice:
- Calories: 150–180 kcal
Carbohydrates: 25–30 g
Protein: 3–5 g
Fat: 4–6 g
Fiber: 2–3 g
Sugar: 1–2 g
Sodium: 200–250 mg - Nutritional values vary depending on ingredients, slice size, and whether eggs or dairy are included.
Recipe Notes
- Use certified gluten-free ingredients if preparing bread for someone with gluten sensitivity or celiac disease.
- Psyllium husk powder is important for creating structure.
- Do not replace gluten-free flours with regular wheat flour.
- The dough should be sticky; this is normal.
- Allow the bread to cool fully before cutting.
- Use a sharp knife for cleaner slices.
- Store properly to maintain softness.
Storage Instructions
- Room Temperature
- Keep the bread in an airtight container or sealed bag.
- Best consumed within:
- 2 days
- Refrigerator
- For longer storage:
- Store refrigerated for up to:
- 5 days
- Warm slices before serving for a softer texture.
- Freezer Storage
- This bread freezes very well.
- To freeze:
- Cool the loaf completely.
- Slice into individual portions.
- Place slices in freezer-safe bags.
- Freeze for up to 3 months.
- When needed, toast slices directly from frozen.
