If you’re searching for a quick air fryer snack recipe, a 3-ingredient cheese bread roll, or an easy cheesy appetizer for kids and family, this recipe is exactly what you need. These crispy air fryer cheese rolls are one of the simplest yet most satisfying snacks you can prepare at home—ready in just 15 minutes from start to finish.
Perfect for busy weekdays, evening cravings, or unexpected guests, this recipe proves that you don’t need complicated ingredients or long cooking times to create something delicious. With just bread, cheese, and butter, you can make a snack that delivers a perfect combination of crunch, softness, and gooey melted filling.
Why This 3-Ingredient Air Fryer Snack Is Trending
In today’s fast-paced lifestyle, people are constantly searching for:
- Quick snack recipes
- Easy air fryer recipes
- Budget-friendly meals
- Kid-friendly food ideas
This recipe fits all these categories. It’s simple, affordable, and requires minimal effort, making it one of the most popular easy homemade snack ideas.
What Makes These Cheese Bread Rolls So Addictive
The magic of this recipe lies in its texture and flavor contrast.
Perfect Texture Combination
- Crispy golden outer layer
- Soft, tender bread inside
- Melted, stretchy cheese center
This balance makes every bite satisfying and comforting.
Healthier Alternative to Fried Snacks
Traditional fried snacks often require a large amount of oil, making them heavy and greasy. Air frying changes that completely.
Benefits of Air Frying
- Uses significantly less oil
- Reduces overall fat content
- Maintains crispiness without deep frying
- Easier cleanup
This makes these rolls a lighter snack option while still delivering great taste.
Ingredient Breakdown and Their Role
Even though this recipe uses only three main ingredients, each one plays an important role.
Bread – The Base Layer
Soft sandwich bread works best because it’s easy to flatten and roll.
- Creates the outer structure
- Becomes crispy when air fried
- Holds the filling securely
White or brown bread both work well.
Cheese – The Star Ingredient
The cheese is what makes this snack irresistible.
- Melts into a creamy center
- Adds richness and flavor
- Creates that classic cheese pull
Best Cheese Options
- Mozzarella (for stretchiness)
- Cheddar (for bold flavor)
- Processed cheese (for smooth melting)
Butter – The Secret to Crispiness
Butter is essential for both taste and texture.
- Helps create a golden crust
- Adds richness
- Ensures even crisping
Skipping butter may result in dry rolls.
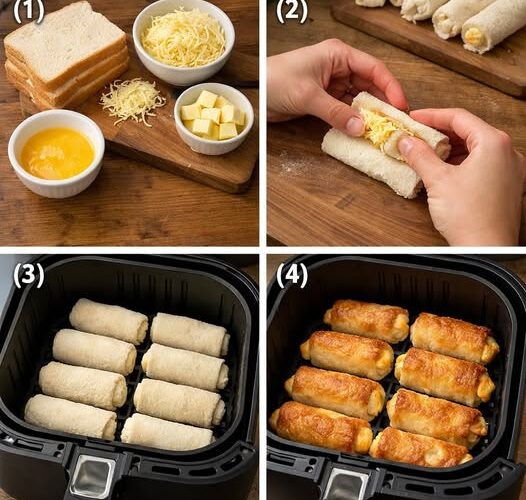
Step-by-Step Preparation Explained
Step 1: Flattening the Bread
Flattening is a crucial step.
- Makes bread flexible
- Prevents cracking
- Helps seal the roll tightly
Use a rolling pin to gently press each slice.
Step 2: Filling and Rolling
Place cheese near one edge and roll tightly.
- Keep rolls compact
- Seal edges properly
- Prevent cheese leakage
You can lightly press or use a bit of water to seal.
Step 3: Preheating the Air Fryer
Preheating ensures:
- Even cooking
- Better crispiness
- Faster results
Step 4: Butter Coating
Brushing butter over the rolls:
- Enhances flavor
- Creates golden color
- Improves texture
Step 5: Air Frying
Cooking at the right temperature ensures:
- Crispy outside
- Melted cheese inside
Turning halfway helps even browning.
Flavor Variations You Can Try
Once you master the basic version, you can easily customize it.
Garlic Butter Version
Mix minced garlic into butter before brushing.
Spicy Cheese Rolls
Add chili flakes or green chilies inside.
Herb-Flavored Rolls
Sprinkle oregano or mixed herbs.
Extra Crunchy Version
Coat rolls with breadcrumbs before air frying.
Saucy Rolls
Add ketchup or mayonnaise inside for extra flavor.
Serving Ideas for Every Occasion
These rolls are incredibly versatile.
Best Ways to Serve
- Tea-time snack
- Party appetizer
- Kids’ lunchbox treat
- Side dish with soup
Perfect Dipping Sauces
Pair with:
- Tomato ketchup
- Chili garlic sauce
- Mayonnaise
- Garlic dip
These enhance the flavor even more.
Common Mistakes to Avoid
- Not sealing rolls properly → cheese leaks
- Overfilling → rolls break
- Skipping butter → less crisp
- Overcrowding → uneven cooking
- Using high heat → burnt outside
Pro Tips for Best Results
- Use fresh, soft bread
- Flatten evenly
- Keep rolls tight
- Preheat air fryer
- Turn halfway through cooking
Storage and Reheating Guide
Storage
- Best eaten fresh
- Can be stored in fridge for 1 day
Reheating
- Air fryer: best method (restores crispiness)
- Oven: good alternative
- Microwave: soft texture
Nutritional Overview (Approximate)
Per serving (2 rolls):
- Calories: 180–220 kcal
- Carbohydrates: 18–22 g
- Protein: 6–8 g
- Fat: 10–14 g
Why This Recipe Is Perfect for Modern Cooking
This recipe matches current food trends:
- Quick and easy
- Minimal ingredients
- Budget-friendly
- Kid-approved
- Versatile
It’s ideal for anyone who wants a fast homemade snack without hassle.
Final Thoughts: Simple Ingredients, Big Flavor
These air fryer cheese bread rolls show how simple ingredients can create something incredibly delicious. With minimal effort and time, you get a snack that is crispy, cheesy, and satisfying.
Once you try them, they’ll likely become one of your go-to quick recipes—perfect for any time of day.
Simple Air Fryer Cheese Bread Rolls Recipe
Ingredients (Serves 2–3)
- 4–6 slices sandwich bread
- 4–6 cheese cubes (mozzarella, cheddar, or processed)
- 2–3 tablespoons butter (melted or softened)
Instructions
1. Prepare Bread
- Trim edges if desired
- Flatten slices using a rolling pin
2. Add Cheese & Roll
- Place cheese on one side
- Roll tightly
- Seal edges
3. Preheat Air Fryer
- Preheat to 180°C (350°F) for 2–3 minutes
4. Arrange & Butter
- Place rolls in basket
- Brush with butter
5. Cook
- Air fry for 8–10 minutes
- Turn halfway
6. Serve
- Let cool slightly
- Serve warm
Quick Tips
- Seal edges well
- Don’t overfill
- Turn halfway for even crisping
Storage
- Refrigerate up to 1 day
- Reheat in air fryer for best results
