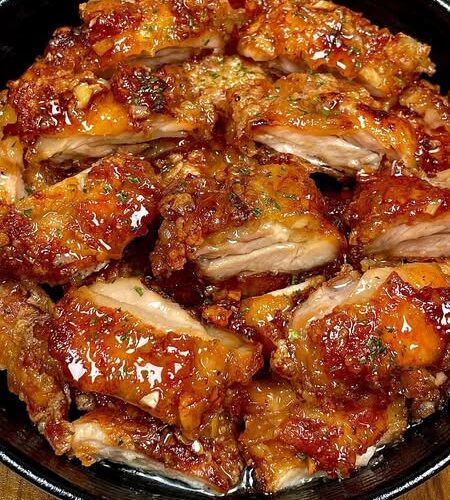
Chicken thighs are one of the most dependable proteins for home cooking. They remain juicy during cooking, develop excellent color when seared, and absorb sauces exceptionally well. Unlike lean cuts that require careful attention to prevent drying out, chicken thighs contain enough natural fat to stay tender while developing rich flavor.
This Honey Glazed Chicken recipe transforms everyday ingredients into a restaurant-style meal using just one skillet. Each piece of chicken is lightly coated with cornstarch before cooking, creating a delicate golden crust that becomes the perfect surface for a glossy honey glaze. Instead of relying on heavy breading or deep frying, the thin coating provides just enough crispness while allowing the natural flavor of the chicken to shine.
The glaze is what makes this dish unforgettable. Honey provides sweetness and creates the sticky finish, soy sauce contributes deep savory notes, garlic and ginger add freshness, sesame oil introduces a nutty aroma, and chili crunch supplies gentle heat with a slight crunch. As the sauce reduces in the pan, it thickens naturally and coats every piece of chicken with a shiny, flavorful glaze.
Whether you’re preparing a quick weeknight dinner, meal-prepping lunches, or cooking for family and friends, this recipe delivers satisfying results without requiring complicated techniques or specialty equipment.
Why This Recipe Is Worth Making
- One of the biggest strengths of this recipe is its balance of flavor, texture, and simplicity.
- The chicken develops a crisp outer layer while staying moist inside. The glaze brings together sweet, salty, savory, spicy, and aromatic elements without any single ingredient overpowering the others. Every bite offers contrast between the lightly crisp exterior and the tender meat underneath.
- Another advantage is the short ingredient list. Most pantry kitchens already contain soy sauce, honey, garlic, cooking oil, and cornstarch, making this recipe convenient even on busy evenings.
- Because everything cooks in one skillet, cleanup is also minimal.
Why Chicken Thighs Are the Best Choice
- Chicken thighs contain more natural fat than chicken breast, which makes them much more forgiving during cooking.
- When exposed to high heat, thighs continue to stay juicy instead of drying out. Their rich flavor also pairs beautifully with bold sauces like honey garlic, teriyaki, barbecue, or spicy Asian-inspired glazes.
- Boneless, skinless thighs are especially convenient because they cook quickly and evenly while requiring very little preparation.
- Bone-in thighs can also be used, although they need additional cooking time.
The Secret Behind the Crispy Exterior
- Many people assume crispy chicken always requires deep frying, but that’s not true.
- A thin coating of cornstarch creates an incredibly light crust once it contacts hot oil. During searing, the starch dehydrates and forms a crisp shell around the chicken.
- Unlike thick flour coatings, cornstarch remains delicate and allows the glaze to cling tightly to the surface instead of sliding off.
- The key is using only a thin dusting. Excess starch creates a heavy coating that can become gummy instead of crisp.
Understanding the Honey Glaze
- A successful glaze depends on balance.
- Honey supplies sweetness while also acting as a natural thickener. As it cooks, it caramelizes slightly, producing the glossy coating that makes glazed chicken so appealing.
- Soy sauce contributes saltiness and umami, preventing the sweetness from becoming overwhelming.
- Fresh garlic provides bold flavor while ginger adds brightness and subtle warmth.
- Sesame oil introduces a roasted nut aroma that complements both the honey and soy sauce.
- Chili crunch adds mild heat along with crispy bits of garlic, onion, and peppers, creating extra texture in every bite.
- As the sauce simmers, moisture evaporates and the sugars become concentrated, resulting in a thick glaze that coats the chicken beautifully.
Preparing the Chicken Properly
- Good preparation makes a noticeable difference.
- Remove the chicken from the refrigerator about ten minutes before cooking. Allowing it to lose some of its chill helps it cook more evenly.
- Pat every piece dry using paper towels. Removing excess moisture encourages better browning because wet chicken tends to steam rather than sear.
- Season both sides lightly with salt and freshly ground black pepper before coating.
- Spread cornstarch onto a shallow plate and gently press each chicken thigh into it until both sides receive a thin, even coating. Shake off any extra starch before transferring the chicken to the skillet.
Choosing the Right Pan
- Heavy-bottomed skillets produce the best results.
- Cast iron holds heat extremely well, helping develop deep golden color and crisp edges.
- A stainless steel skillet also works beautifully because it encourages caramelization and creates flavorful browned bits on the bottom of the pan.
- Nonstick pans are acceptable but typically produce less browning, which means slightly less flavor in the finished sauce.
Building Flavor Through Searing
- The searing process is one of the most important parts of this recipe.
- Heat the skillet thoroughly before adding oil.
- Once the oil shimmers, carefully place the chicken into the pan without overcrowding.
- Leave each piece undisturbed for several minutes. Constant flipping prevents proper browning and limits crust formation.
- Once the underside becomes golden brown, flip the chicken and cook until both sides are evenly colored and the internal temperature reaches 165°F (74°C).
- The browned bits left behind after cooking become valuable flavor for the glaze.
Turning Pan Drippings into a Rich Sauce
- Instead of washing the skillet after cooking the chicken, use all those caramelized bits to enrich the sauce.
- Lower the heat slightly before adding the prepared glaze.
- As the sauce begins to simmer, scrape the bottom of the pan with a wooden spoon. Those browned pieces dissolve into the sauce, creating deeper flavor.
- Continue cooking until the glaze thickens enough to coat the back of a spoon.
- The finished sauce should appear glossy, smooth, and slightly sticky.
Coating the Chicken
- Return the cooked chicken to the skillet after the glaze reaches the proper consistency.
- Turn each piece several times while spooning sauce over the top.
- Allow the chicken to simmer gently for another minute or two.
- This final step gives the coating time to absorb some of the glaze while keeping its light crispness.
- Finish with sesame seeds and chopped chives or green onions for extra texture and freshness.
Serving Suggestions
- This chicken pairs well with many side dishes.
- Steamed jasmine rice is one of the most popular choices because it absorbs every drop of the flavorful glaze.
- Brown rice provides additional fiber and a nuttier taste.
- Roasted potatoes create a hearty meal, while mashed potatoes become creamy with the extra sauce.
- For lighter meals, pair the chicken with roasted broccoli, asparagus, green beans, snap peas, or a crisp cucumber salad.
- Stir-fried vegetables such as bell peppers, carrots, mushrooms, and bok choy also complement the sweet and savory flavors.
Helpful Tips for Success
- Always pat the chicken dry before seasoning.
- Apply only a thin layer of cornstarch.
- Avoid overcrowding the skillet.
- Cook over medium-high heat to encourage browning.
- Reduce the heat before adding the honey glaze to prevent burning.
- Taste the sauce before serving and adjust sweetness or spice if desired.
- Allow the chicken to rest for two or three minutes before serving to keep it juicy.
Easy Variations
- There are many ways to customize this recipe.
- Replace honey with maple syrup for a deeper sweetness.
- Add orange zest and fresh orange juice for a citrus glaze.
- Mix in extra chili flakes for additional heat.
- Include sautéed mushrooms or bell peppers during cooking.
- Finish with toasted peanuts or cashews for crunch.
- Substitute chicken breast if preferred, while reducing cooking time to avoid drying out the meat.
Storage and Meal Prep
- Allow leftovers to cool completely before refrigerating.
- Store in an airtight container for up to four days.
- For longer storage, freeze individual portions for up to two months.
- Reheat gently in a skillet with a tablespoon of water to loosen the glaze.
- Microwave reheating also works, although the exterior will lose some of its crisp texture.
- This recipe is excellent for meal prep because the flavors become even richer after resting overnight.
- Healthy Honey Glazed Chicken Thighs
- Yield
- 4 servings
- Preparation Time
- 15 minutes
- Cooking Time
- 20 minutes
- Total Time
- 35 minutes
Ingredients
- For the Chicken
- 6 boneless, skinless chicken thighs
- ⅓ cup cornstarch
- Salt, to taste
- Freshly ground black pepper, to taste
- ¼ cup olive oil or neutral cooking oil
- For the Honey Glaze
- ¼ cup low-sodium soy sauce
- 3 tablespoons honey
- 1½ teaspoons sesame oil
- 1 tablespoon chili crunch
- 4 garlic cloves, minced
- 1 teaspoon freshly grated ginger
- Garnish
- Sesame seeds
- Chopped chives or green onions
Instructions
- Remove the chicken from the refrigerator about 10 minutes before cooking. Pat dry thoroughly and season both sides with salt and pepper.
- In a small bowl, whisk together soy sauce, honey, sesame oil, chili crunch, garlic, and grated ginger until smooth.
- Place the cornstarch on a plate and lightly coat each chicken thigh. Shake off any excess.
- Heat a large skillet over medium-high heat and add the olive oil.
- Arrange the chicken in the skillet in a single layer. Cook undisturbed for 4–5 minutes until golden brown.
- Flip and cook another 4–5 minutes, or until the internal temperature reaches 165°F (74°C).
- Transfer the chicken to a plate.
- Reduce the heat to medium-low and pour the prepared glaze into the same skillet.
- Stir while scraping up the browned bits from the bottom of the pan.
- Simmer for 2–3 minutes until the sauce thickens and becomes glossy.
- Return the chicken to the skillet and turn each piece until evenly coated.
- Cook for an additional 1–2 minutes.
- Garnish with sesame seeds and chopped chives before serving.
Nutrition
- Calories: 300 kcal
- Protein: 28 g
- Carbohydrates: 12 g
- Sugars: 9 g
- Fat: 15 g
- Saturated Fat: 3 g
- Cholesterol: 125 mg
- Sodium: 420 mg
- Potassium: 420 mg
- Fiber: 0.5 g
Duration
- Course: Main Course
- Prep Time: 15 minutes
- Cook Time: 20 minutes
- Total Time: 35 minutes
- Servings: 4
- Difficulty: Easy
- Cuisine: American-Inspired
