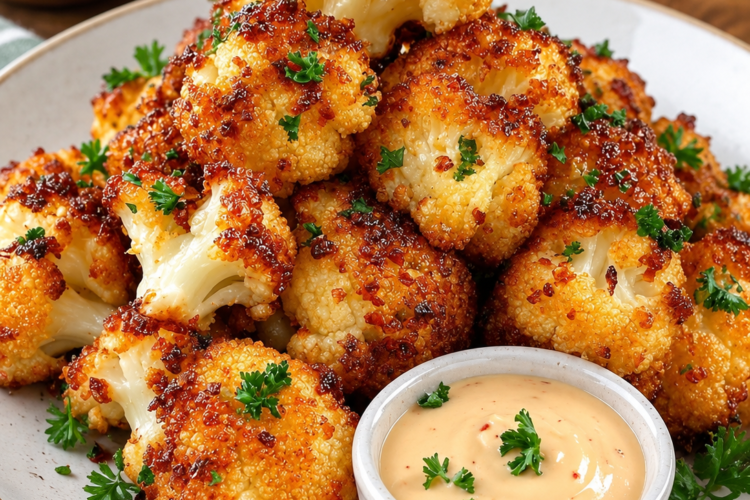
When I want a quick vegetable side without spending much time in the kitchen, air fryer cauliflower is one of the easiest things to make. It needs only a few basic ingredients, takes about 20 minutes from start to finish, and comes out nicely browned around the edges with tender cauliflower inside.
I especially like making cauliflower this way because there is no need to deep-fry it. A small amount of olive oil is enough to help the seasonings stick and gives the florets a lovely roasted texture. The air fryer does most of the work, so once the cauliflower is seasoned and in the basket, there isn’t much left to do except shake it a few times.
This is the kind of side dish I can put together while preparing the rest of dinner. It works well alongside everyday meals, but I also like adding the roasted florets to salads, bowls, or soups. They can even be eaten on their own as a light snack.
Why I Make Cauliflower in the Air Fryer
- Cauliflower can be prepared in many different ways, but air frying is especially convenient when I want something with browned, slightly crisp edges.
- The biggest thing to remember is not to pack the air fryer basket too tightly. The cauliflower needs some room around it so the hot air can circulate. When the basket is overcrowded, the florets release moisture and tend to steam instead of roasting. Giving them space makes a noticeable difference in the final texture.
- I also like that this recipe doesn’t require a long list of seasonings. Turmeric gives the cauliflower a warm golden color, smoked paprika adds a gentle smoky flavor, and salt and black pepper bring everything together. Olive oil helps coat the florets and encourages them to brown nicely.
Getting the Cauliflower Ready
- I start with one small head of cauliflower. Before cutting it, I remove the outer leaves and wash the head well.
- The next step is important: I dry the cauliflower thoroughly. I usually use a clean kitchen towel or paper towels to remove as much moisture as possible. Wet cauliflower is more likely to steam in the air fryer, so drying it well helps with browning.
- Once it is dry, I place the cauliflower on the cutting board and cut away the thick stalk so the head can sit securely. Then I cut the head in half vertically.
- To remove the core, I hold the knife at an angle and cut around the tough center. The florets usually separate quite easily after that. If any pieces remain attached, I use the tip of the knife to separate them.
- I don’t worry about making every floret exactly the same size. However, I try to keep them reasonably similar so they cook at roughly the same rate.
Don’t Throw Away the Leaves and Stems
- The leaves and stems don’t have to go straight into the trash. They are edible too.
- I like roasting the leaves along with the cauliflower when I have them available. They become nicely browned and make a useful addition to the finished dish.
- The stems can also be saved. They can be added to soups, stir-fries, or stews, depending on what I’m cooking. They can even be frozen and used later.
Seasoning the Florets
- Once the cauliflower is cut, I put all the florets into a large bowl. This makes it much easier to coat everything evenly.
- First, I drizzle the olive oil over the cauliflower. Then I add the ground turmeric, smoked paprika, salt, and ground black pepper.
- I toss everything together until the florets are evenly coated. I find that using my hands or a large spoon works well here because the seasonings can otherwise settle at the bottom of the bowl.
- The combination is simple, but it gives the cauliflower plenty of flavor. The smoked paprika adds a roasted, smoky note, while turmeric gives the florets their golden appearance. Black pepper and salt keep the seasoning balanced without overpowering the vegetable.
- There is no need to add extra ingredients to make this recipe work. The listed seasonings are enough for a simple everyday side dish.
Getting the Air Fryer Ready
- I use the air fryer at 390°F (200°C) for this recipe.
- The cauliflower goes directly into the air fryer basket once it has been seasoned. The most important part is arranging the florets in a single layer whenever possible.
- I leave a little space between the pieces rather than piling them on top of one another. If all the cauliflower doesn’t fit comfortably, I cook it in batches.
- It might be tempting to put everything in at once to save time, but overcrowding can prevent the cauliflower from browning properly. A slightly smaller batch with enough space usually gives a much better result.
Air Frying the Cauliflower
- With the cauliflower arranged in the basket, I air fry it at 390°F (200°C) for about 15 minutes.
- I don’t simply leave it untouched for the entire cooking time. Every five minutes, I give the basket a good shake. This moves the florets around and helps them cook and brown more evenly.
- After the first five minutes, the cauliflower will just be starting to cook. After another shake, more of the edges should begin to take on color. By the end, the florets should be tender and have some browned, crispy-looking edges.
- Air fryers can vary, so I use the 15-minute cooking time as a guide rather than an absolute rule. Smaller florets can cook faster, while larger pieces may need a little more time.
- I check the cauliflower toward the end and decide whether it needs another minute or two based on how browned and tender it looks.
The Secret to Better Browning
- For me, the most important part of this recipe is giving the cauliflower enough room.
- A single layer allows the hot air to move around the florets. This helps the outside brown while the inside becomes tender.
- If the basket is crowded, the cauliflower won’t have the same chance to develop those browned edges. Instead, the pieces can release moisture and cook more like steamed vegetables.
- Another small detail that helps is drying the cauliflower before seasoning it. It doesn’t need to be bone dry, but removing excess water makes it easier to get a roasted texture.
- Shaking the basket every five minutes is also worth doing. It prevents some pieces from staying on the same side throughout cooking and gives the whole batch a more even finish.
What If I Want to Skip the Oil?
- The olive oil can be left out if needed.
- The cauliflower will still cook and the seasonings will still add flavor, but the texture will be somewhat different. Oil helps the florets brown and become crispier, so the oil-free version won’t have quite the same roasted texture.
- If I’m looking for the crispiest result, I keep the olive oil in the recipe as listed.
Can Frozen Cauliflower Be Used?
- Fresh cauliflower is the best choice for this recipe, but frozen florets can also be used.
- If using frozen cauliflower, I make sure it is completely thawed first. Frozen cauliflower contains a lot of moisture, and putting it into the air fryer while still frozen can result in a softer, mushier texture.
- After thawing, I dry the florets well before seasoning them. This helps remove some of that extra moisture and gives the cauliflower a better chance of browning.
- Fresh cauliflower is still my preferred option when I want the best texture.
How I Serve It
- Once the cauliflower is finished, I remove the florets from the air fryer basket and transfer them to a serving plate.
- I usually serve them warm, but they can also be enjoyed cold.
- As a simple side, they work well with all kinds of main dishes. Because the seasoning is not too complicated, the cauliflower can fit into different meals without competing with everything else on the plate.
- I also like using the roasted florets in salads and bowls. They add texture and make a simple bowl feel much more substantial.
- Another easy way to use them is in soup. Roasted cauliflower can add a nice cooked vegetable flavor and a little texture when added to a bowl of soup.
- And if there are leftovers, I don’t mind eating them straight from the refrigerator. They make a convenient light snack when I want something savory.
A Few Things I Keep in Mind
- The first thing is the size of the florets. I try not to cut some pieces very large and others extremely small. Keeping them fairly similar means they are less likely to finish cooking at completely different times.
- I also watch the cauliflower near the end of the cooking time. Air fryers differ from one another, and the exact cooking time can change depending on the appliance and the size of the florets.
- The five-minute shakes are useful for this reason too. They give me a chance to check how quickly the cauliflower is browning and decide whether it needs more or less time.
- Most importantly, I don’t overcrowd the basket. If necessary, I cook the cauliflower in batches. It takes a little longer, but the extra space helps the florets brown instead of steam.
Simple Seasoning, Lots of Uses
- One reason I keep coming back to this recipe is that it doesn’t require much preparation.
- The cauliflower gets coated with olive oil, turmeric, smoked paprika, salt, and black pepper, then the air fryer takes care of the cooking. There is no complicated sauce and no need to stand over the stove.
- At the same time, the finished cauliflower is versatile enough to use in different meals. It can stay as a simple side dish, become part of a salad, go into a bowl, or be added to soup.
- The seasoning can also be adjusted in other preparations, but the basic version is a good place to start.
Final Result
- After about 15 minutes in the air fryer, the cauliflower should be tender inside with nicely browned edges. I like to serve it as soon as it comes out, while the outside still has some of that roasted texture.
- This is a simple recipe, but a few small details make a difference: dry the cauliflower well, coat the florets evenly, give them space in the basket, and shake them every five minutes.
- With those steps taken care of, a plain head of cauliflower turns into an easy, flavorful side dish without much effort. It is quick enough for a weekday meal and versatile enough that I can use the leftovers in salads, bowls, soups, or simply eat them as they are.
Description
- Crispy, roasted air fryer cauliflower made with olive oil, turmeric, smoked paprika, salt, and black pepper. It is a quick and simple vegetable side dish that takes about 20 minutes from preparation to serving.
Duration
- Prep Time: 5 minutes
- Cook Time: 15 minutes
- Total Time: 20 minutes
Ingredients
- 1 small cauliflower head, cut into florets
- 1 tablespoon olive oil
- ¼ teaspoon ground turmeric
- ½ teaspoon smoked paprika
- ½ teaspoon salt
- ¼ teaspoon ground black pepper
Instructions
- Remove the leaves from the cauliflower, wash it, and pat it completely dry with a clean kitchen towel or paper towels.
- Cut the cauliflower into florets and place them in a large bowl.
- Drizzle the florets with olive oil. Add the turmeric, smoked paprika, salt, and black pepper.
- Toss well until the cauliflower is evenly coated with the oil and seasonings.
- Arrange the cauliflower in the air fryer basket in a single layer, leaving some space between the florets. Cook in batches if necessary.
- Air fry at 390°F (200°C) for about 15 minutes.
- Shake the air fryer basket every 5 minutes so the cauliflower cooks and browns evenly.
- Check the cauliflower near the end of cooking and adjust the time if needed.
- Remove from the basket and serve warm or cold.
Notes
- Avoid overcrowding the air fryer basket. Extra space helps the cauliflower brown instead of steam.
- Air fryers and cauliflower florets can vary, so keep an eye on the cauliflower and adjust the cooking time as needed.
- The cauliflower can be made without oil, although the texture will be less crispy.
- Frozen cauliflower can be used, but thaw it completely and dry it well before seasoning.
- Other seasonings can be used, including curry powder, cumin, coriander, garlic powder, onion powder, or chili powder.
- Avocado oil or corn oil can be used instead of olive oil.
- Cauliflower leaves and stems are edible and can be saved for roasting, soups, stir-fries, stews, or other uses.
Nutrition Information
- Calories: 49 kcal
- Carbohydrates: 4 g
- Protein: 1 g
- Fat: 4 g
- Saturated Fat: 1 g
- Sodium: 311 mg
- Potassium: 198 mg
- Fiber: 1 g
- Sugar: 1 g
- Vitamin A: 123 IU
- Vitamin C: 32 mg
- Calcium: 15 mg
- Iron: 1 mg
