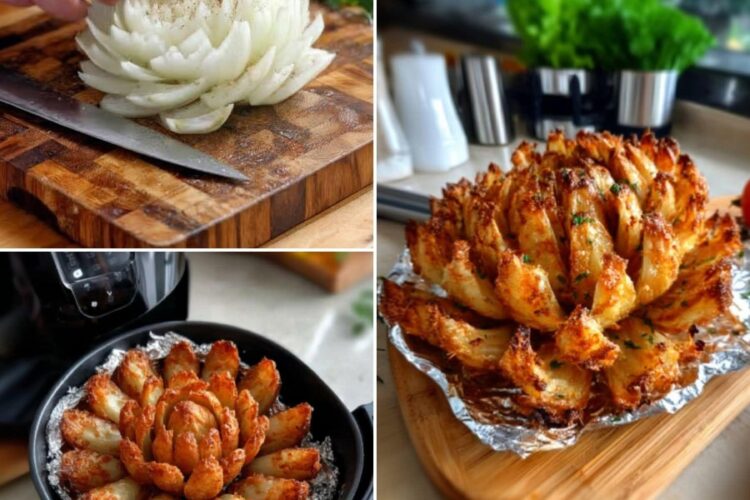
A beautifully prepared Blooming Onion is one of those appetizers that immediately catches attention. With its dramatic flower-like shape, crispy golden coating, and tender onion petals, it looks like a restaurant-quality dish but can actually be prepared easily in your own kitchen.
The classic blooming onion became famous as a deep-fried appetizer, usually served with a creamy dipping sauce. While the traditional version is delicious, it requires a large amount of oil and special frying equipment. This air fryer version creates the same enjoyable experience with a lighter cooking method.
Using an air fryer allows hot air to circulate around the onion, producing a crisp exterior while keeping the inside soft and juicy. The result is a flavorful appetizer with a crunchy seasoned coating and a sweet, tender onion center.
This recipe is perfect for many occasions, including family dinners, weekend gatherings, sports events, holiday celebrations, and casual parties. It creates a beautiful centerpiece for the table and is especially enjoyable when served warm with a creamy dipping sauce.
The secret to a successful blooming onion is not complicated cooking techniques. The most important steps are choosing the right onion, cutting the petals carefully, creating a flavorful coating, and allowing enough cooking time for the center to become tender.
Why You Will Love This Air Fryer Blooming Onion
- There are many reasons this appetizer has become a favorite among home cooks.
Crispy Without Deep Frying
- Traditional blooming onions are usually submerged in oil, which creates a very rich and heavy dish. The air fryer method provides a similar crispy texture while using significantly less oil.
- A light coating of cooking spray or a small amount of oil helps the breading become golden and crunchy without making the appetizer overly greasy.
Impressive Presentation
- The flower shape makes this dish look much more complicated than it actually is.
- When the onion petals open during cooking, it creates a beautiful presentation that works well for parties and gatherings.
Perfect Combination of Textures
A great blooming onion offers different textures in every bite:
- Crispy seasoned coating on the outside
- Tender onion petals underneath
- Creamy dipping sauce for contrast
- The combination creates an appetizer that is both satisfying and memorable.
Easy to Customize
- The seasoning can easily be changed based on your preferences.
You can make it:
- Spicy with extra cayenne or chili powder
- Cheesy with Parmesan breadcrumbs
- Smoky with additional smoked paprika
- Herb-flavored with Italian seasonings
Choosing the Best Onion
- The onion is the star of this recipe, so selecting the right one is important.
Use a Large Sweet Onion
Sweet onions work best because they have:
- Mild flavor
- Large size
- Naturally sweet taste
- Layers that separate easily
- Popular choices include Vidalia onions and other large sweet onion varieties.
- A good onion should feel firm and heavy for its size. Avoid onions with soft areas, bruises, or signs of spoilage.
- For the most attractive blooming shape, choose an onion weighing approximately 12–16 ounces.
The Importance of Keeping the Root Attached
- One of the most important steps when preparing a blooming onion is leaving the root intact.
- The root acts like a natural holder that keeps all the petals connected during cutting and cooking.
- If the root is removed, the onion layers can separate completely and the flower shape may fall apart.
- Always cut from the top of the onion toward the root while stopping before reaching the bottom.
Creating the Blooming Onion Shape
- Although the cutting process may seem intimidating, it becomes simple with careful preparation.
- Start by removing the dry outer skin while keeping the root attached.
- Trim a small amount from the top of the onion.
- Place the onion root-side down on a stable cutting board.
- Make several evenly spaced cuts from the top toward the root.
- Continue dividing the sections until you create approximately sixteen individual petals.
- After cutting, gently separate the layers with your fingers.
- Take your time during this step because the petals can break if handled roughly.
- The goal is to create a flower shape while keeping the onion connected at the base.
Understanding the Coating Ingredients
- The coating is what transforms the onion into a crispy appetizer.
- Each ingredient contributes to the final texture and flavor.
- All-Purpose Flour
- Flour creates the foundation of the crispy coating.
- It helps the wet ingredients stick to the onion and provides structure for the breading.
- Seasoning the flour is important because it allows flavor to reach every layer.
- Paprika and Smoked Paprika
- Paprika adds color and mild sweetness.
- Smoked paprika provides a deeper flavor with a subtle smoky quality that works beautifully with the sweet onion.
- Together, they create a more complex seasoning profile.
- Garlic Powder and Onion Powder
- These seasonings enhance the natural onion flavor while adding savory depth.
- They help ensure the coating tastes flavorful instead of simply crunchy.
- Cayenne Pepper
- Cayenne is optional but adds a gentle heat.
- You can adjust the amount depending on your spice preference.
- For a milder version, leave it out completely.
- For a spicy appetizer, increase the amount or add additional chili seasoning.
- Egg and Milk Mixture
- The egg mixture helps the breadcrumbs stick to the onion petals.
- It creates a moisture layer between the seasoned flour and the crunchy coating.
- Whisking the eggs and milk until smooth ensures even coverage.
- Panko Breadcrumbs
- Panko breadcrumbs are the secret to a lighter, crispier texture.
- Compared with regular breadcrumbs, panko creates larger, airier crumbs that become especially crunchy in the air fryer.
Preparing the Creamy Dipping Sauce
- A blooming onion is incomplete without a flavorful dipping sauce.
- The sauce balances the crispy coating with a cool, creamy texture.
The combination of:
- Mayonnaise
- Ketchup
- Horseradish
- Paprika
- Garlic powder
- Lemon juice
- creates a sauce that is tangy, slightly spicy, and rich.
- The horseradish provides the classic kick often associated with blooming onion sauces.
- For extra heat, add hot sauce or additional cayenne pepper.
Tips for Perfect Air Fryer Results
- Coat Every Petal
- The biggest difference between an average blooming onion and a great one is even coating.
- Make sure the seasoned flour reaches between the petals.
- The egg mixture should also cover the inside areas so the breadcrumbs can stick properly.
- Chill Before Cooking
- Refrigerating the coated onion before air frying is a helpful step.
- The chilled coating becomes more stable and is less likely to fall away during cooking.
- Even a short 15-minute rest can improve the final texture.
- Preheat the Air Fryer
- A properly heated air fryer begins cooking immediately.
- This helps the coating become crisp instead of slowly absorbing moisture.
- Do Not Overcrowd the Basket
- The onion needs space for hot air to circulate.
- If the basket is too small, the coating may not crisp evenly.
Cook Until the Center Is Tender
- A common mistake is removing the onion too early.
- The outside may appear golden while the center is still firm.
The onion is ready when:
- The coating is deep golden brown
- The petals have opened
- The inside is soft when tested with a knife
Flavor Variations
- This recipe is easy to customize with different seasonings.
Cajun Blooming Onion
Add:
- Cajun seasoning
- Extra paprika
- Chili powder
- for a bold Southern-inspired flavor.
Parmesan Herb Version
Mix breadcrumbs with:
- Grated Parmesan cheese
- Italian seasoning
- Dried parsley
- for a savory cheesy crust.
Spicy Southwest Style
Add:
- Chili powder
- Smoked paprika
- Crushed red pepper
- for extra heat.
Ranch-Flavored Version
- Add ranch seasoning powder to the flour mixture for a familiar creamy herb flavor.
Serving Suggestions
- This appetizer pairs beautifully with many meals.
Serve alongside:
- Grilled steak
- Burgers
- Barbecue chicken
- Pulled pork sandwiches
- Fried chicken
- Fish dishes
- Fresh salads
- Roasted vegetables
It is also ideal for:
- Game nights
- Birthday parties
- Holiday gatherings
- Potluck events
- Family celebrations
- Place the dipping sauce in the center of the onion for a restaurant-style presentation.
Storage and Reheating
- Blooming onions are best when served immediately because the coating is at its crispiest.
- However, leftovers can be stored.
- Refrigerator Storage
- Allow the onion to cool completely.
- Place it in an airtight container and refrigerate for up to two days.
- Store the dipping sauce separately.
- Reheating
- The air fryer is the best way to restore crispiness.
- Heat at:
- 350°F (175°C) for 4–6 minutes
- Avoid using the microwave because it will soften the coating.
Common Mistakes to Avoid
- Cutting Through the Root
- This causes the petals to separate.
- Always leave enough of the base intact.
- Using Too Much Liquid
- Excess egg mixture can make the coating slide off.
- Allow extra liquid to drip away before adding breadcrumbs.
- Skipping the Chill Time
- The coating may not stick properly if the onion goes directly into the air fryer.
- Not Spraying Oil
- A small amount of oil helps create a golden, crispy finish.
- Serving Too Late
- The texture is best immediately after cooking.
Description
- A crispy golden blooming onion made with a seasoned coating, crunchy panko breadcrumbs, and a creamy dipping sauce. This lighter air fryer version delivers restaurant-style flavor with less oil.
Recipe Information
- Prep Time: 30 minutes
- Chill Time: 15 minutes
- Cook Time: 18–25 minutes
- Total Time: About 1 hour 10 minutes
- Servings: 4–6
- Difficulty: Easy
- Category: Appetizer, Snack
Ingredients
Blooming Onion
- 1 large sweet onion (Vidalia preferred)
- Cooking spray or 2 tablespoons vegetable oil
Seasoned Flour Mixture
- 1 cup all-purpose flour
- 1 teaspoon paprika
- 1 teaspoon smoked paprika
- 1 teaspoon garlic powder
- 1 teaspoon onion powder
- 1 teaspoon salt
- ½ teaspoon black pepper
- ¼ teaspoon cayenne pepper (optional)
Egg Mixture
- 2 large eggs
- ½ cup milk
Crispy Coating
- ½ cup panko breadcrumbs
Dipping Sauce
- ½ cup mayonnaise
- 2 tablespoons ketchup
- 1 tablespoon prepared horseradish
- ½ teaspoon paprika
- ¼ teaspoon garlic powder
- ¼ teaspoon black pepper
- 1 teaspoon fresh lemon juice
Equipment Needed
- Air fryer
- Sharp knife
- Cutting board
- Mixing bowls
- Whisk
- Plate or tray
Instructions
- Prepare the Onion
- Remove the outer skin while keeping the root attached.
- Cut about ½ inch from the top.
- Place the onion root-side down.
- Make four cuts toward the root without cutting completely through.
- Continue cutting until you have approximately sixteen petals.
- Gently separate the layers.
- Prepare the Flour Seasoning
Mix together:
- Flour
- Paprika
- Smoked paprika
- Garlic powder
- Onion powder
- Salt
- Pepper
- Cayenne pepper
- Stir until evenly combined.
- Prepare Wet Ingredients
- Whisk eggs and milk together in a separate bowl.
- Coat the Onion
- Cover the onion with seasoned flour.
- Separate petals gently to coat inside layers.
- Dip or brush with egg mixture.
- Add panko breadcrumbs and press lightly so they stick.
- Spray lightly with cooking oil.
- Chill
- Place the coated onion in the refrigerator for 15 minutes.
- Air Fry
- Preheat air fryer to:
- 375°F (190°C)
- Place onion root-side down in the basket.
- Cook for 10 minutes.
- Spray dry areas if needed.
- Continue cooking for another 8–15 minutes until:
- Golden brown
- Crispy
- Tender inside
- Make Sauce
Mix together:
- Mayonnaise
- Ketchup
- Horseradish
- Paprika
- Garlic powder
- Pepper
- Lemon juice
- Stir until smooth.
- Serve
- Transfer the blooming onion to a serving plate.
- Place dipping sauce beside or inside the onion.
- Serve immediately.
Nutrition
- Calories: 280–350
- Protein: 6 g
- Carbohydrates: 35 g
- Fat: 16 g
- Fiber: 3 g
- Sugar: 6 g
- Sodium: 600 mg
