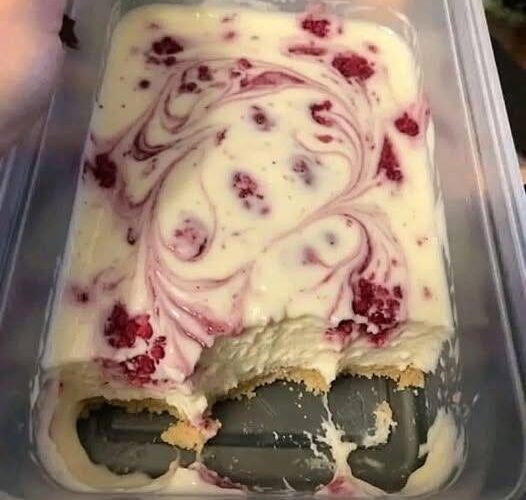
Few frozen desserts are as elegant and satisfying as homemade Raspberry Ripple Ice Cream. This timeless treat combines two beautifully contrasting flavors: a rich, smooth vanilla ice cream base and a bright raspberry sauce that creates beautiful ribbons throughout every scoop. The creamy sweetness of the ice cream balances perfectly with the natural tartness of raspberries, creating a dessert that feels luxurious while still allowing the fresh fruit flavor to shine.
Raspberry Ripple Ice Cream has remained popular for generations because it offers everything people love about homemade frozen desserts. It has a silky texture, a refreshing fruit flavor, and an attractive appearance created by colorful raspberry streaks flowing through the pale vanilla ice cream. Unlike commercial versions that often rely on artificial flavors and stabilizers, homemade ice cream allows you to control the ingredients and create a more natural taste.
Making ice cream from scratch may seem complicated at first, but understanding the purpose of each step makes the process much easier. The key elements are a properly prepared custard base, a flavorful fruit ripple, careful chilling, and gentle freezing. When these techniques are followed, the result is a smooth and creamy dessert with a texture similar to premium ice cream shops.
Why Raspberry Ripple Ice Cream Is So Special
- The beauty of this dessert comes from the balance between simple ingredients and careful preparation. The vanilla ice cream base provides richness from cream, milk, and egg yolks, while the raspberry ripple introduces brightness, color, and a slightly tangy fruit flavor.
- Each component has an important role:
- Heavy cream creates a rich mouthfeel and smooth texture.
- Whole milk balances the richness while keeping the ice cream lighter.
- Egg yolks create a custard base that gives the ice cream a luxurious texture.
- Sugar adds sweetness and helps control ice crystal formation.
- Vanilla enhances the creamy flavor.
- Raspberries provide fresh fruit character and beautiful color.
- Lemon juice improves the raspberry flavor by adding brightness.
- The combination creates a dessert that is sweet without becoming overwhelming and fruity without losing its creamy character.
Choosing the Best Raspberries
- The quality of raspberries has a major effect on the final flavor. Fresh raspberries during peak season provide the most intense aroma and natural sweetness, but frozen raspberries are also an excellent option because they are usually frozen at their freshest point.
- When selecting fresh raspberries:
- Choose berries that are bright in color.
- Avoid berries that appear soft, moldy, or leaking juice.
- Look for fruit with a fresh fragrance.
- Frozen raspberries work especially well because the sauce will be cooked, meaning the texture difference is not noticeable. They are also convenient because you can make this ice cream throughout the year.
The Importance of a Smooth Raspberry Ripple
- The raspberry sauce is not simply a topping; it is an essential part of the ice cream experience. A good ripple should be thick enough to remain in visible ribbons but soft enough to blend slightly with each scoop.
- Cooking the raspberries with sugar helps concentrate the flavor by removing excess water. The addition of lemon juice enhances the natural berry taste, while a small amount of cornstarch helps create the correct consistency.
- Straining the sauce is an optional but highly recommended step. Raspberry seeds are edible, but removing them creates a smoother, more professional texture. The finished ripple becomes silky and blends beautifully with the ice cream.
Creating the Perfect Ice Cream Base
- The foundation of excellent homemade ice cream is a well-made custard. The custard method creates a richer texture than simple no-churn recipes because egg yolks add structure and prevent large ice crystals from forming.
- The most important technique is tempering the eggs. Hot milk should never be added directly to egg yolks because the heat can cook the eggs too quickly and create lumps. Instead, a small amount of warm milk is gradually whisked into the yolks before combining everything together.
- This gentle process allows the eggs to slowly increase in temperature and creates a smooth custard.
How to Know When the Custard Is Ready
- A properly cooked custard should be thick enough to coat the back of a spoon. When you run your finger across the spoon, the line should remain visible.
- The custard should:
- Look smooth and creamy.
- Have a slightly thickened texture.
- Never reach a boiling point.
- Overheating can cause the eggs to scramble, which affects the final texture. Cooking slowly over low heat provides the best results.
Why Chilling the Ice Cream Base Matters
- Patience plays an important role in homemade ice cream. After preparing the custard, it should be cooled completely before churning.
- Chilling accomplishes several things:
- It allows flavors to develop.
- It improves the final texture.
- It helps the ice cream freeze faster.
- It reduces the formation of ice crystals.
- Many professional ice cream makers allow their base to rest overnight because the extra time creates a smoother and richer result.
The Role of Churning
- Churning does more than simply freeze the mixture. It introduces tiny air bubbles while preventing large ice crystals from forming.
- A properly churned ice cream should have:
- A smooth consistency.
- A creamy texture.
- A soft, scoopable structure.
- If the ice cream freezes too slowly or is not churned properly, it may become icy rather than creamy.
Creating Beautiful Raspberry Swirls
- The ripple effect is what makes this dessert visually appealing. The goal is to create distinct ribbons of raspberry throughout the ice cream.
- Avoid mixing the raspberry sauce completely into the ice cream because this will create a pink raspberry-flavored ice cream rather than a ripple effect.
- The best technique is layering:
- Add a layer of ice cream.
- Add small spoonfuls of raspberry sauce.
- Repeat the layers.
- Gently swirl with a knife or skewer.
- A few gentle movements create attractive ribbons without blending the sauce completely.
Homemade Ice Cream Texture Secrets
- Several small details make a major difference:
- Use Full-Fat Dairy
- Fat creates smoothness and prevents a watery texture. Heavy cream and whole milk provide the ideal balance.
- Avoid Excess Water
- Water forms ice crystals. Concentrating the raspberry sauce helps maintain a creamy texture.
- Freeze Properly
- A tightly covered container protects the ice cream from freezer odors and reduces ice formation.
- Allow Softening Before Serving
- Homemade ice cream freezes harder than many store-bought varieties because it contains fewer stabilizers. Letting it sit for several minutes before scooping improves the texture.
Common Mistakes to Avoid
- Cooking the Custard Too Quickly
- High heat can cause curdling. Slow cooking creates a smoother result.
- Skipping the Chilling Step
- Warm custard will freeze unevenly and create a less creamy texture.
- Adding Warm Raspberry Sauce
- The raspberry ripple should always be completely chilled before combining with the ice cream.
- Overmixing the Ripple
- Too much stirring removes the beautiful swirl effect.
- Storing Without Protection
- Air exposure causes freezer burn and affects flavor quality.
Delicious Ways to Serve Raspberry Ripple Ice Cream
- This ice cream is wonderful on its own, but it can also become part of a more elaborate dessert.
- Serve it with:
- Fresh raspberries
- Chocolate brownies
- Waffle cones
- Shortbread cookies
- Sponge cake
- Fruit tarts
- Pancakes
- Crepes
- Chocolate sauce
- Whipped cream
- The combination of chocolate and raspberry is especially popular because the rich cocoa flavor complements the fruity sweetness.
Creative Variations
- Chocolate Raspberry Ripple Ice Cream
- Add cocoa powder to the custard base for a chocolate version.
- Mixed Berry Ripple Ice Cream
- Replace some raspberries with strawberries, blueberries, or blackberries.
- Raspberry Cheesecake Ice Cream
- Add small pieces of cream cheese mixture for a cheesecake-inspired dessert.
- White Chocolate Raspberry Ice Cream
- Mix melted white chocolate into the base for a sweeter, richer variation.
- Recipe Description
- This homemade Raspberry Ripple Ice Cream features a creamy vanilla custard base combined with a smooth raspberry sauce swirl. The dessert has a rich texture, fresh fruit flavor, and beautiful raspberry ribbons throughout. Perfect for summer days, celebrations, or anytime you want a premium homemade frozen dessert.
Recipe Information
- Course: Dessert
- Cuisine: International
- Difficulty: Intermediate
- Servings: 10–12 scoops
- Preparation Time: 45 minutes
- Cooking Time: 20 minutes
- Chilling Time: 4 hours or overnight
- Freezing Time: 6 hours minimum
- Total Time: Approximately 11 hours including freezing
Ingredients
- For Raspberry Ripple Sauce
- 500 grams fresh or frozen raspberries
- 150 grams granulated sugar
- 1 tablespoon lemon juice
- 2 tablespoons water
- 1 teaspoon cornstarch
- 1 tablespoon cold water
For Vanilla Ice Cream Base
Homemade Raspberry Ripple Ice Cream
- 600 milliliters heavy cream
- 400 milliliters whole milk
- 6 large egg yolks
- 180 grams granulated sugar
- 2 teaspoons vanilla extract
- 1 small pinch salt
Optional Ingredients
- 2 tablespoons skim milk powder for extra creaminess
- 1 tablespoon glucose syrup or light corn syrup for smoother texture
Instructions
- Prepare the Raspberry Sauce
- Add raspberries, sugar, lemon juice, and water to a saucepan.
- Cook over medium heat while stirring gently.
- Allow the mixture to simmer for 10–15 minutes until the berries soften and release their juices.
- Mix cornstarch with cold water to create a smooth slurry.
- Add the slurry to the raspberry mixture while stirring.
- Cook for another 2–3 minutes until slightly thickened.
- Strain the sauce through a fine sieve if a seedless ripple is desired.
- Cool completely, then refrigerate.
- Prepare the Custard Base
- Heat milk, half of the sugar, salt, and optional milk powder in a saucepan.
- Warm gently without boiling.
- In another bowl, whisk egg yolks with the remaining sugar until smooth.
- Slowly add warm milk while whisking continuously.
- Return the mixture to the saucepan.
- Cook over low heat while stirring constantly.
- The custard is ready when it coats the back of a spoon.
- Do not allow it to boil.
- Remove from heat and strain.
- Add vanilla extract and glucose syrup if using.
- Cool the Custard
- Place the custard bowl over an ice bath.
- Stir occasionally until completely cool.
- Cover and refrigerate for at least four hours.
- Overnight chilling provides the best texture.
- Combine with Cream
- Lightly whip the heavy cream until slightly thickened.
- Fold the chilled custard into the cream.
- Mix gently until smooth.
- Churn the Ice Cream
- Pour the mixture into an ice cream machine.
- Churn according to manufacturer instructions.
- Continue until the texture resembles soft serve.
- Create the Raspberry Ripple
- Transfer a layer of ice cream into a freezer container.
- Add spoonfuls of raspberry sauce.
- Repeat layers.
- Use a knife to gently swirl the raspberry sauce through the ice cream.
- Do not overmix.
- Freeze Until Firm
- Cover tightly.
- Freeze for at least 6 hours.
- Allow the ice cream to soften for 5–10 minutes before serving.
Nutrition
- Serving Size: 1 scoop
- Calories: 280 kcal
Protein: 5 g
Carbohydrates: 28 g
Fat: 17 g
Saturated Fat: 10 g
Fiber: 2 g
Sugar: 24 g
Sodium: 70 mg - Nutrition values may vary depending on ingredients and portion size.
Storage Instructions
- Store homemade Raspberry Ripple Ice Cream in a tightly sealed freezer-safe container.
- For best quality:
- Keep frozen at a consistent temperature.
- Place plastic wrap directly on the surface before sealing.
- Consume within 2–3 weeks for the freshest flavor.
